Tamiya 1:20 Ferrari F2001


I have gone through the instruction sheet and made some notes on the experiences I had during the building of the specific sections.
Step 1
The steering wheel looks sharp when you put down some CF decals. Time spent detailing the steering wheel buttons will really pay off.
The plastic seat belt system is very nice from Tamiya and is great for the modeler on a budget. Personally I would prefer PE hardware and belt material.
Step 2
Parts B25 and B26 can be glued to the tub A1 before the seat can be installed. This means the monocoque can be glued puttied and painted without the seat installed.
The X-18 (semi-gloss black) for the outside of the tub can use a little CF decaling. The inside of the tub isn't as noticeable so you can save some CF decaling by just painting the inside X-18.
Step 3
The airbox and cockpit surround (B13) can be installed onto the tub along with the maintenance cover (B16 or B17). The only problem may be the fact that when you do prime and paint this part it is possible that you may fill up the gap between panels. If you are normally heavy with the painting it is suggested that you do paint the cockpit surround and access panels separately. Then you would have to be aware that the panels may not fit due to paint buildup and you my be required to do a bit of sanding to get the parts to fit. I left the winglets (B22 & B23) off until the very end.
For some reason I had a problem with the airbox location. When I got to fitting the rear bodywork there was a rather noticeable gap between the airbox and the rear bodywork. The rest of the tub was fine. I am not sure if this was due to the type of glue I used (Methyl Chloride or Tenex 7) caused the part to slightly shift but I had to rip the airbox off and reposition it to make the gap smaller. I do plan on building a second one so I will see if this was a one off problem or a mould problem.
I sanded off the suspension mounting points that are supposed to be painted silver (X-10). I replaced these with Bare metal foil that I cut out using the Perfect parts PE detail set as a template. By sanding off these point it also makes it easier to paint and polish this area.
I installed the maintenance hatch B17 on my kit. To make it more realistic I used an exacto knife and thinned the leading edge of the air intake to try and give it some scale thickness.
Step 4
Glue sand and putty these parts. Before the glue is dry test fit these parts to the tub and undertray to make sure they fit. To be sure of a good fit I left this assembly together and taped everything to made sure they dried correctly.
Step 5
A lot of stuff assembled here that I did not do until almost the very end. I did not install the side intakes or the suspension system until almost the very end.
For the suspension pieces I painted a base colour of Testors Metalizer Dark Anodic Grey and then airbrushed semi-gloss black through a mesh screen to put a pattern on the suspension part. I find the result very subtle and the low cost is great. I prefer this method over CF decals since these parts are handled quite a bit and if there was decals on the parts then there is a possibility of damage which would require fixing.
I had no major problems with the brake system. I basically built them out of the box and did not do any detailing to this area since with the wheels installed you cannot see much.
Step 6
The undertray has a few fiddly bits so a bit of care should be taken here to make sure that everything is lined up at the correct angles. I had to do a bit of filling here to hide a few seam lines.
Step 7
Well of course here I completely ignored the instructions and did not install the side pods. I did assemble them as sub assemblies adding wires to the electrical boxes. I did glue the part C3 to the under tray. For the part of the under tray that was supposed to be painted silver I cut some foil from a cigarette packaging since this has a pattern already in the foil. The undertray was initially painted semi-gloss black and then the upper surfaces were decaled with CF decals. I did not decal the underside since the model would be mounted to a base and would not be seen so why use up a large chunk of decal on something that will not be seen. Also I did not paint the plank underneath. There are decals for the transition from the under tray to the body colour. I left these until the very end.
Step 8
I saved this step until all sub-assemblies were completed.
Step 9
Out of the box this area does not look too bad. I added CF decals to the gearbox upper portion. The oil catch tank (painted XF-16) I separated from the kit to add some wiring and to stand it off from the gearbox with a thin sheet of styrene.
The foil provided in the kit for the suspension is a bit thick but look OK on the model. You are provided with more then enough foil so don't worry about making a mistake.
Step 10
Nothing really major in this step. Some minor wiring will help liven things up. Parts of the gearbox that is supposed to be painted semi-gloss black (TS-29) is really CF on the real car.
A wash of black in the radiators will bring out the details here.
Step 11
If you can detail part E7 or scratch build a new item this will make this area look even more realistic. Also check references for assembling parts F21 and F3 to F36. To be accurate you have to do a bit of chopping and gluing. This is hard to describe unless there is a photo of the actual car in front of you.
I found fit of part C16 to be tight after painting so I had to scrape a bit of paint away from the edges before it can be installed.
Hose clamp detail on parts E12 and E13 will make these assemblies look good. I used the hose clamp PE set from Perfect Parts.
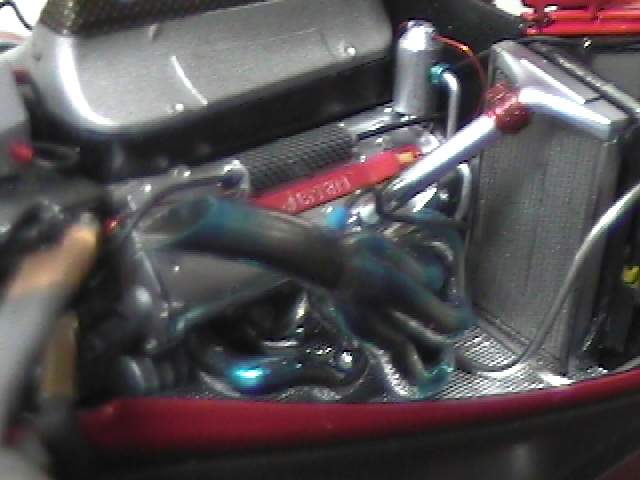
Step 12
Due to moulding limitations there are a couple of locations on the exhaust pipes that are not realistic. A bit of filing will make this more realistic. To allow the moulds to be pulled apart there has to be a draft angle and there can not be any undercuts. So a cross section that in reality is round like an 'O' is actually 'D' shaped. File these shapes back to 'O' shape.
The ends of the exhaust have been tapered to make the ends look more to scale. After assembly and puttying you can then make even more thinner by filing the edge even thinner.
For painting see the images on how I used Alclad II paints and Tamiya clears to get a realistic finish.
Step 13
No dramas here. A little painting and decaling will make the brake assemblies look realistic.
Do not glue the exhaust pipe at this point. To make sure your engine cover will work place the engine into the undertray along with the monocoque. Test fit the exhaust pipes and then see if you can put on the rear bodywork. If the fit is not correct adjust the pipes until they are in the correct place. When you are happy that this assembly will work use some slow setting glue and glue the exhaust pipes on. Put the engine cover on so that the exhaust pipes are in the correct place as the glue dries.
Step 14
No dramas here
Step 15
I did not glue in part F30. This allows you easier access to the middle wing to paint and decal. Later on after the wing elements were painted and the inner surfaces were decaled with CF decals I then popped in the top element. Fit was very good.
Anything that was semi-gloss black I added CF decal.
Step 16
Normally when I glue the endplates to the wing I set it down on a flat surface to make sure it dries properly. Unfortunately the front wing on the F2001 is shaped such that the middle section of the wing touches the ground, which raises the endplates. For this reason I had to eyeball the gluing of the wing endplates to make sure they dry straight.
When gluing the nose together B9 & B10 I would set this on the wing element C11 to make sure that the uprights dry so that it will fit the wing later.
No problems with the white front wing decals. I used Microsol to get the decals to sit.
When assembling the wing to the nose I first attached the nose to the body and then glued the wing on to make sure it would sit correctly. (the wing endplates were parallel to the ground sideways and that it was straight side to side.
Step 17
I painted the wheels with a Krylon Semi-gloss black as a base coat for Alcad II Polished Aluminum. Unfortunately the finish was rough so I had to try and strip the wheels and try again. The wheels are slightly different from the F1-2000. The tires do pick up a lot of dirt so I cleaned them with a Q-Tip and rubbing alcohol. I took care cleaning over the letters as others have said that their letters have come off the tires when they were wetted.
I also took care when I was installing the tires trying not to stretch the letters or put my fingers over the letters as little as possible.
Step 18
Nothing major here. The rear wing assembly was such a tight fit that I did not use any glue. Do watch the arrows on the tires to make sure they are in the correct direction.
Step 19
Gluing of all the side pieces and end plates were done in the beginning. Priming and painting was done with the monocoque and the rest of the body parts to make sure everything would fit. Only the small winglets were installed at the end. I had to scrape some paint away form the tabs of the winglets and from the holes in the engine cover to get them to fit.
Step 20
No major problems with the side deflectors. They actually went on very easily. The engine cover I had to slightly fiddle with to get it to fit.
Step 21
The final little items are added here. I installed all of these items with white glue to prevent marring the paint surfaces. For the mirrors I had to clean up the attachment point to get them to fit.
For the fuel filler caps they did fit before I did any painting. After painting I wanted to show off the detail so I installed the flaps open. I did tried to see if they would fit after painting and this required a bit of sanding of the edges. It didn't matter that I went through the red paint and primer since the edge of the fuel filler flaps was going to be black.
I did have trouble putting the metal transfers into the fuel filler areas. Decals and painting built up enough to make this a very tight fit.
I made an error and put the No 1 decal on the wrong side.
Conclusion
In my opinion another great kit from Tamiya. I have heard people have problems with the fit of the engine cover. Whether this is a moulding, packaging or paint buildup problem I don't know. If you are aware of the possibility of fit problems due to paint buildup you can assemble and paint the kit to try and minimize this potential problem.
Tamiya always leaves me thinking how can they get any better and somehow they do get better.
[ Prev ] [ Next ]