Tamiya 1:20 Ferrari F2001

79.jpg
Here is the other fuel filler cap open with the PE insert. I made
a mistake by not reading the instructions and placed the white No 1 decal here instead of on the other side.

80.jpg
Here is a close-up of the rear suspension I wanted to replace the kit part of the rear anti-roll adjustment bar but was unable to find any extra PE parts that suited the purpose. I tried to make a
little assembly but the parts were so small that I kept breaking them or losing them. In the end I used the kit part.

81.jpg
Another view of the engine area. I have added some wiring to the oil catch tank The red fittings are Modellers hose end fittings. They look OK and were quick to add and were cheaper than turned aluminum items. I didn't have any reference pictures
of the tank so I used references of the F1-2000 The F1-2000 had a different shaped tank as you can check in the F1-2000 kit but I would guess that the plumbing would be very similar.

82.jpg
This is a close-up of the steering wheel I have not detailed the thing like I did the F1-2000. One could spend a week painting
everything up. I did the F1-2000 by hand painting and decalling but since I have heard of people using a punch and die set to make little washers that they can paint and then install. This sure sounds easier then what I tried but you never know. The decal sheet comes with a layout of only one track (France) For other tracks you will need an aftermarket sheet such as the Studio 27 one. I have added CF decals to the steering wheel face which adds a bit to the high tech look of the steering wheel. There are quite a few detailed pictures of the 2000 steering wheel so it should be no problem super-detailing this.

83.jpg
This is the view down into the cockpit showing the kit supplied seat belt assembly. It doesn't look too bad for out of the box and is a lot better than the decals that was normally provided. Personally if you can afford them would go with the PE hardware and belt material.

84.jpg
Here is the side pods as well as the "Barn Doors". The bottom of the transition from red to black is a decal provided. This did
not look too bad since the CF decal I used for the undertray was fairly dark. The barn doors were fairly easy to install since the mounting point are not as fiddley compared to past years.

85.jpg
Here is the underside of the front. Not much to see here. I did not noticed until later when I was installing the front wheels
that the suspension piece a the bottom was not in the groove. In fact most of the suspension parts were not glued in but friction fit.

86.jpg
Different shots
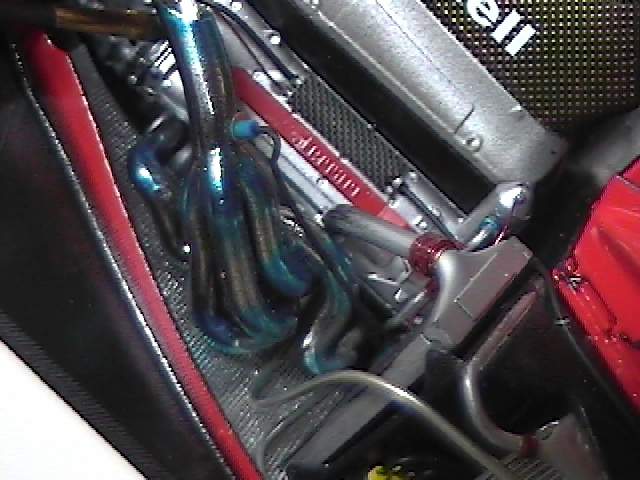
87.jpg
Another view of the left side of the engine

88.jpg
This is a close-up of the airbox. The Camera on top wasn't much of a problem to install. Decalling it was a bit of a problem. Every time I handled it I would mess up other decals that I had already installed. The winglets needed some work to get them
to fit due to paint buildup. They were also not easy to glue in. I normally use my fingers or tweezers but neither appeared to work here. I finally used a toothpick and some blue tak. I have seen other people use this trick and it does work fairly well.