Revival 1:20 Ferrari 500 1953
Kit No 85102
By Alexander Kung
March 23 2000
I am sorry the pictures look lousy but at some point I had to shrink the images due to server space. I have found more room but have been too lazy to scan in the pictures again.
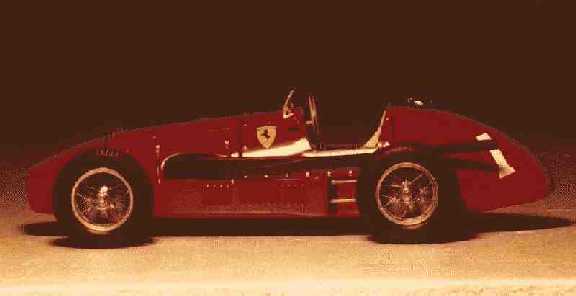
Side view of completed model. Items of note: edge of wood rimmed steering wheel, , engine hood tie down straps, pin heads for rivets

Rear view completed mode, Items of note: posable steering, engine hood tie down strap (right side)

Top View

Top view with hood off

Assemble view. Items of note: sheet aluminum used to replace kit instrument panel, fuel tank bare metal foiled (a bit useless since it isn't seen when model is complete)

Off angle shot of completed model
History:
This Formula One car was driven in the 1953 World Championship with drivers Ascari, Hawthorn, Farina and Villoresi. The 2.5l inline 4 produces 240hp at 7000 rpm and powered Ascari to his second World Championship title. The vehicle kept the same body and chassis as the 1952 car as Ferrari concentrated on improving the engine output.
Contents:
Injected styrene, clear plastic, metal body as well as chassis components and engine components. Prewired wheels, vinyl wire harness, vinyl tires, vinyl seat, decals
Paints used:
Body - Automotive Lacquer GM Spectra Red 81-84 (Canadian Tire No 47-8120-6)
Other - Tamiya acrylics, Testors Enamels
Glue Used
Testors Tube Glue for plastic parts
CA Glues to glue metal parts and metal to plastics.
White gluel for the seat
Aftermarket:
None available for the kit.
Fotocut - Nut & Bolt, MSC Model Products - AN Fittings, S&S Specialties - Linkage Arms Millennium 2000 Polishing Kit
Modifications:
1. Replace front mesh screen with metal mesh - kit item was a plastic with a pattern in it. The kit part had a hole in the screen for a starting crank. This was replicated on the mesh with a photo etched donut ring from Waldron
2. Strip and repaint body - Since modifications were being done to the body the paint was marred.
3. Add rivets to body panel - Rivets were done with pin heads. Kit rivets were sanded flat. These points were then used as guides to drill the holes to accept the shortened shafts of the pins so that only the heads would stick out.
4. Replace and add engine wiring - Using the kit vinyl harness and references the engine wiring was made out of circuit board wire (28 gauge?)
5. Add brake detail - Kit wiring was replaced with better wire. The brake assembly is a completed unit in the kit and had to be taken apart to add various vent holes and cut out the ones on the part.
6. Front wheels made poseable - brass rod with the ends flattened and drilled were used to make the front steering mechanism. The kit part was used as a template for the length of the parts needed.
7. Add carburetor detail - Photo etched bolt heads and wiring was added according to references. The PE bolt heads really add to the realism of the model
8. Replace mirrors - The mirrors are acrylic mirror sheet that was cut to shape then thinned from 0.125" to about 0.02"
9. Scratch windshield - brass mounts, aluminum frame, new glass from acetate. Used kit part as reference
10. Scratch cast metal fuel cap - Kit part was used to make a female mould from resin. Melted solder was then poured into the mould and allowed to cool. The mould showed signs of damage but since I was making only one good part I didn't care too much. There are other resins that may take the temperature of melted solder.
11. Scratch metal cast knock offs - The same method as above was used to produce 4 good new metal knock offs.
12. Scratch steering assembly - Square and round aluminum and brass tubes were used to make a new steering assembly to replace the kit plastic part.
13. Add wood to steering wheel - Kit metal steering wheel was filed flat on the front and back face. Balsa wood was glued to these fat faces using CA glue. Once dry the wheel was carved and stained.
14. Ferrari emblem on steering wheel counter sunk - The middle of the steering wheel was drilled for a recess. A Ferrari decal was then placed in the recess. Once dry clear epoxy was placed into the hole until it was level with the center of the steering hweel
15. Scratch pedals - Aluminum and brass sheets were used to replace the kit parts.
16. Scratch instrument panel and gauge backs - Aluminum sheet was used for the instrument panel face. Various gauges from the parts decal box were used to detail the instrument panel.. Waldron bezels were used for the instrument panel rings.
17. New Shift lever - Pin with a round head used to replace kit plastic part.
18. Seat covered - Tissue paper and white glue was placed over the vinyl kit part to give the seat a more cloth look.
19. Scratch engine cover spring tie downs -Kit tie downs are straight ugly straps moulded to the engine cover. These were ground off and new ones were made from wire and photo etched window crank handles. The springs also had rubber tubing around the springs to protect the paint. This was replicated with heat shrink tubing .
20. Body modified - Screw together construction meant that the body was a few holes that have to be filled and areas taht have to be filed down.
Good Points:
Nice wire wheels
No one else makes the kit
Nice turned intake trumpets
Bad Points:
A simple kit with few parts.
Hard to find good references
Vinyl harness has to be replaced
Vinyl seat was warped and was hard to straighten
Expensive compared to the plastic kit
Moulded in hood straps
Body has a couple of errors to compensate for the screw together construction
Decals didn't want to stay on
References:
Hans Tanner and Doug Nye, Ferrari Sixth Edition, Haynes
1989 Fine Scale Modeler
F1 Annual 1989
Comments:
The wire wheels in the kit are very nice. There is also a plastic version of this kit. (No 85102/P) The only difference is the body is plastic and the wire wheels are plastic. You do get the metal engine parts and frame. You also get the turned metal intake trumpets. For the price difference I would recommend the plastic kit and find aftermarket wire wheels. With a little work the results can look very good.
As of the above review date the kits are still available
Questions: